Skip to content

Entries tagged "centos".

I/O stats for Centos

! Edit 12.04.2011 - RHEL/Centos 5.6 finally brings support for iotop. 
You should be able to find an RPM package in EPEL.

Today someone asked me on #centos how he can see what's using so much I/O on the system. Without thinking I replied "iotop", but a google search turned out there is no iotop for Centos 5.

Solution? Too easy!

If you have the RPMforge repo active on your system then just:

yum install dstat
otherwise:
wget http://apt.sw.be/redhat/el5/en/x86_64/extras/RPMS/dstat-0.7.2-1.el5.rfx.noarch.rpm; \
yum localinstall --nogpgcheck ./dstat-*.rpm
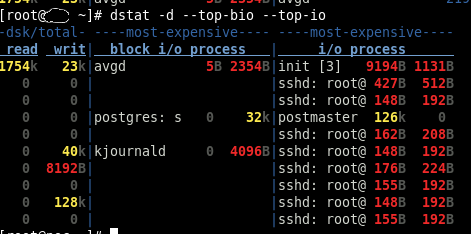
After the installation running `dstat -d --top-bio --top-io` will reveal some nice information.

It's important to install dstat from RPMForge and not EPEL or Centos Base, as you will otherwise get a package that is too old and lacking the necessary plugins.

dstat running:

Avoid cp overwrite confirmation

Tonight I have to copy and partially overwrite a lot of data on a Centos 5 system and encountered a little problem.
The "cp" command turned out to be a PITA as it was asking me for confirmation each and every time a file was to be overwritten.
Why is this happening? Because RedHat/Centos guys have added the following alias in bash conf files:
alias cp='cp -i'
-i means interactive, or in more words: "prompt before overwrite (overrides a previous -n option)".
The solution to this safe but annoying alias (in this case) is to `unalias` it or just ignore it by prefixing the command with a \.
\cp -a /home/xyz/* /home/zyx/
No more annoying confirmations, now I can go to bed. ZzzZz.

Linux Raid - replacing a physical device

Right now I'm dealing with a broken linux raid 1 in which both physical drives are reporting lots of bad blocks.
I have chosen the drive that exhibited the least problems and I'm having it cloned with dd_rescue on to a new one from a SysRescCD Live CD
dd_rescue /dev/old-b0rk3d-drive /dev/new-clone-drive
It's a good idea to run the above in a screen, especially if you're doing this via the internet.
Once the cloning is completed I simply put the new drive in the original server and expect it to boot - with a degraded but working raid.
In the next step I add a new empty drive, with a similar size (500 GB in my case) and clone the partition table with sfdisk:
sfdisk -d /dev/existing-drive | sfdisk /dev/new-empty-drive
Use `fdisk -l` before and after the partition cloning to be sure you're doing the right thing.
Once we have an identical partition table on both drives we can start adding partitions from the new drive to our linux raid. Assuming the cloned drive is sda and the new drive is sdb, our md setup should loook like this:
root@sysresccd /root % cat /proc/mdstat 
Personalities : [raid0] [raid1] [raid6] [raid5] [raid4] [raid10] 
md3 : active raid1 sda6[1]
      297780736 blocks [2/1] [U_]
      
md1 : active raid1 sda3[1]
      4192896 blocks [2/1] [U_]
      
md2 : active raid1 sda2[1]
      153597376 blocks [2/1] [U_]
      
md0 : active raid1 sda1[1]
      30716160 blocks [2/1] [U_]

And now let's add partitions to our raid layout:
mdadm /dev/md0 --add /dev/sdb1
mdadm /dev/md1 --add /dev/sdb3
mdadm /dev/md2 --add /dev/sdb2
mdadm /dev/md3 --add /dev/sdb6
And that's that, now we can see the raid resync'ing:
cat /proc/mdstat


We're not finished yet!
As this drive (and therefore its clone as well) was secondary (sdb) on the original system I expect problems with grub.
By default, when installing on to a linux raid Centos/Anaconda only installs grub on the first drive (sda in this case) and therefore my drive being sdb will lack this in its MBR.
If this is the case, we won't be able to boot at all from the cloned hdd, so we need to boot again from the Live CD, mount the linux raid from it and then chroot in to the OS and do the grub magic from there.
Assuming everything works nicely form the Live CD and the md devices are properly mounted under /mnt we can start:
export SHELL=/bin/bash
chroot /mnt/clone
#grub
grub> find /boot/grub/stage1
 (hd0,0)
 (hd1,0)
grub> root (hd0,0)
 Filesystem type is ext2fs, partition type 0xfd

grub> setup (hd0)
 Checking if "/boot/grub/stage1" exists... yes
 Checking if "/boot/grub/stage2" exists... yes
 Checking if "/boot/grub/e2fs_stage1_5" exists... yes
 Running "embed /boot/grub/e2fs_stage1_5 (hd0)"...  15 sectors are embedded.
succeeded
 Running "install /boot/grub/stage1 (hd0) (hd0)1+15 p (hd0,0)/boot/grub/stage2 /boot/grub/grub.conf"... succeeded
Done.

grub> root (hd1,0)
 Filesystem type is ext2fs, partition type 0xfd

grub> setup (hd1)
 Checking if "/boot/grub/stage1" exists... yes
 Checking if "/boot/grub/stage2" exists... yes
 Checking if "/boot/grub/e2fs_stage1_5" exists... yes
 Running "embed /boot/grub/e2fs_stage1_5 (hd1)"...  15 sectors are embedded.
succeeded
 Running "install /boot/grub/stage1 (hd1) (hd1)1+15 p (hd1,0)/boot/grub/stage2 /boot/grub/grub.conf"... succeeded
Done.

grub>quit 
And we're done now: reboot.
! - Please pay extra attention when doing this kind of operations, it's very easy to format the wrong HDD etc. :-)
Get rid of the orphans in a Centos system

How to find out orphaned packages in your Centos/RHEL system?
yum install yum-utils
package-cleanup --orphans

`man package-cleanup` for more cool stuff

Remote Centos 5 installation over VNC

Remember, remember... no, not the 5th of November, but to use 6-11 chars passwords for VNC when doing remote Centos installations!

RPMs for Courier email suite

Here's a Centos repo containing RPMs for the Courier suite (imap, mta, authlib etc):
http://dl.nux.ro/rpm/5/courier/
Repo file: http://dl.nux.ro/rpm/nux-courier.repo
The packages have been built directly from the courier tarball, didn't bother to tweak the spec file in any way.
Use them at your own risk etc etc.

RPMs for the Debian whois client

Here's another Centos repo containing RPMs for the Debian whois client (jwhois never works!):
http://dl.nux.ro/rpm/5/whois/
Repo file: http://dl.nux.ro/rpm/nux-whois.repo
PS: This should work on Fedora as well.

Newer kernel for Centos

Want to try the latest kernel on a Centos server? Although that is highly unadvisable, in the desperate and cataclismic event that you really need it, do not forget to enable CONFIG_SYSFS_DEPRECATED_V2, otherwise you'll end up in a kernel panic.
Thanks Toracat for the tip!

Centerim fixes and repo

The centerim.org team finally released a new version of their IM client which fixes the annoying Yahoo disconnection bug that had been plaguing the application for almost 1 year.
There is a known problem with Yahoo connectivity. We believe it is fixed in 4.22.9.49. 
Please test and report back. Thanks. 
www.centerim.org
More action can be seen in their bugzilla.
For Centos/RHEL/ScientificLinux users I have started mantaining a repository:
wget http://dl.nux.ro/rpm/nux-centerim.repo -O /etc/yum.repos.d/nux-centerim.repo
(EPEL repo may be required to install some stuff - e.g. gpgme).

PS: Yes, I am aware EPEL includes Centerim, actually my RPM is based on their specfile, but their version is outdated.

RedHat 6

Wow! RHEL 6 is out now!!
Thank you RedHat & the Fedora community!
http://press.redhat.com/2010/11/10/red-hat-enterprise-linux-6-a-technical-look-at-red-hats-defining-new-operating-platform/
How does it compare with older RedHat versions? Find out here!
Can't wait to get my hands on Centos 6! Its building has already began!

ScientificLinux 6


Apparently the people at CERN & FermiLab have rolled their sleeves, too, as there is already an alpha iso available for download:
ftp://ftp.scientificlinux.org/linux/scientific/6rolling/iso/
For those who don't know, ScientificLinux is Centos' less popular brother (born from the same mother - RedHat), built by and for the people at CERN and FermiLab.
Exciting times!

Centos 5 x86_64 OS image for xen domU

This is my Centos 5 x86_64 domU image. There are many like it on the internet, but this one is mine.
http://dl.nux.ro/xen/domU/

The image contains a rather minimal install of Centos 5, with postfix and ssh started at boot time.The root password is in the cfg file.
Let me know if you need any help or different images (32 bit maybe, I do Centos only).
I will build Centos 6 images as soon as it is released, so stay tuned.

New stuff in RHEL/Centos 5.6

With some delay I find out that RHEL 5.6 (and consequently Centos 5.6) will have:
  - bind 9.7 - improved DNSsec support
  - PHP 5.3 - support for namespaces
  - ebtables - Ethernet layer firewall
  - dropwatch - network stack packet analysis
  - IPA fonts - Japan JIS X 0213:2004 support
  - sssd - offline credential caching
All good and well, but the PHP upgrade will break a LOT of sites! I really didn't expect this.. I'll have to prepare my arse for a lot of messing around; also shall setup a PHP 5.2 repo for customers. :-(

Elastix on Xen howto

Elastix is an open source Unified Communications Server software that brings together IP PBX, email, IM, 
faxing and collaboration functionality.
It has a Web interface and includes capabilities such as a Call Center software with predictive dialing.

The Elastix functionality is based on open source projects including Asterisk, HylaFAX, Openfire and Postfix.
Those packages offer the PBX, fax, instant messaging and email functions, respectively.

As presented above (fragment from the wikipedia page), Elastix can be quite useful if you want to run your own PBX.
As it is based on Centos I initially tried to install it the Centos way, but I encountered lots of problems so I ended up using a Linux KVM vm (I'm in love!), tweak that a bit, tar it up and transfer it to a xen dom0.
I have already lost too much time trying to get it installed so I will not comment on this anymore.
I will assume that you will use my Elastix (v2.0.3) xen image and that you also have a working LVM based (Centos) xen dom0. As most things linux there are multiple ways of doing this, this is my way. Let's begin:

- 1 - Let's create 2 LVM volumes for the elastix vps:
lvcreate -L10G -nelastix-root vg0; lvcreate -L1G -nelastix-swap vg0

- 2 - Download and extract the image:
wget http://dl.nux.ro/xen/domU/elastix_32/elastix.tar.bz2; tar xjf elastix.tar.bz2

- 3 - Format the volumes and copy the contents of the tar archive on to the root one:
mkfs.ext3 /dev/vg0/elastix-root
mkswap /dev/vg0/elastix-swap
mkdir /mnt/elastix
mount /dev/vg0/elastix-root /mnt/elastix
cp -a elastix/* /mnt/elastix/
umount /mnt/elastix/

- 4 - Create a xen cfg file for this domU: vi /etc/xen/auto/elastix.cfg
bootloader = "/usr/bin/pygrub"
name = "elastix"
memory = "512"
disk = [ 'phy:/dev/vg0/elastix-root,sda1,w', 'phy:/dev/vg0/elastix-swap,sda2,w' ]
vif = ['vifname=elastix,bridge=xenbr0']
on_poweroff = 'destroy'
on_reboot = 'restart'
on_crash = 'restart'

- 5 - After saving that file start the virtual machine:
xm create -c /etc/xen/auto/elastix.cfg

- 6 - Log in the vm, change the password using the "passwd" command and set up the networking (run "setup" if you don't know which system config files to edit). When asked for a password please input "parola2011" (without the quotes). Please change the root password ASAP!!
- 7 - Visit http://IP_of_VM/ and log in as admin with password parola2011 (change the admin password ASAP!).

Enjoy!

PS: You may want to change some system settings like the keyboard layout (set to uk) and timezone (set to Europe/Bucharest).

mod_substitute in rhel/centos 5

Apparently mod_substitute has finally been backported into rhel 5:
Transaction Check Error:
  file /usr/lib64/httpd/modules/mod_substitute.so from install of httpd-2.2.3-43.el5.centos.3.x86_64 conflicts with file from package mod_substitute-2.2.11-1.el5.ld.x86_64

No need for 3rd party repos for this module anymore. Hurray! :-)

No more php53 repo

As Centos 5.6 and Centos 6 will provide PHP 5.3 shortly, there is no need for my repo so I'm discontinuing that. If you need help migrating to the stock packages let me know.
I will be still packaging PHP 5.2 as there are still cases where this version is needed. For contact use rpm at li.nux.ro

CentOS install over VNC

Sometimes we need/want to reinstall a remote Centos (or other distro) server. We can either ask the data centre to do it, but this can be costly or we can do it ourselves as long as we still have a functioning system.
The procedure to install Centos (same for RHEL and Fedora) is amazingly simple, the only thing we need is a barely functional system with grub and good connectivity.
My main source of inspiration for this article was a blog post from Karanbir; I'm writing this only to have a lighter, easier to read and copy/paste from document.
In this case I'm also using Centos as the existing remote OS. Here we go:
cd /boot
wget http://mirror.centos.org/centos/5/os/x86_64/images/pxeboot/initrd.img -O pxe-initrd.img
wget http://mirror.centos.org/centos/5/os/x86_64/images/pxeboot/vmlinuz -O pxe-vmlinuz

Now we need to add a grub entry using the downloaded files and set it default. Add something similar to your grub.conf/menu.lst (make sure to change the IP settings, password** etc):
title Centox-vnc-install
        root (hd0,0)
        kernel /boot/pxe-vmlinuz vnc vncpassword=blah132 headless ip=123.231.234.106 netmask=255.255.255.248 gateway=123.231.234.105 dns=4.2.2.3 hostname=blahserver ksdevice=eth0 method=http://mirror.centos.org/centos/5/os/x86_64/ keymap=uk lang=en_GB
        initrd /boot/pxe-initrd.img

You might also want to add "biosdevname=0 net.ifnames=0" to the vmlinux command line if you don't want your network interfaces to be renamed to em1 or eno1 which seem to happen in CentOS 6 and 7 under certain circumstances.

Double check the above entry is default and reboot. Keep pinging the IP you specified above, when it's up start vncviewer on IP:1. That's it, now you can reinstall your server(s) whenever you want without asking for KVMoIP or the data centre staff to do it for you.
Enjoy!


** Achtung! Vncpassword needs to be 6-8 characters long otherwise you won't be allowed to connect.

PHP 5.3 & Bind 9.7 in Centos Testing repo

Apparently we can now have PHP 5.3 and Bind 9.7 in Centos from the Centos-testing repo even though Centos 5.6 (nor 6.0 for that matter) is not yet released. Nice!

Transmission bittorrent client for EL6

As it turns out there's no graphical bittorrent client in EL6, therefore a quick copy/paste tip so you don't end up butchering your favourite OS like this guy (though he was trying to achieve smth a tad different):
wget ftp://ftp.lug.ro/fedora/linux/releases/14/Everything/x86_64/os/Packages/transmission-common-2.04-2.fc14.1.x86_64.rpm ftp://ftp.lug.ro/fedora/linux/releases/14/Everything/x86_64/os/Packages/transmission-gtk-2.04-2.fc14.1.x86_64.rpm
yum localinstall --nogpgcheck transmission-common-2.04-2.fc14.1.x86_64.rpm transmission-gtk-2.04-2.fc14.1.x86_64.rpm

Modify the paths accordingly if you're on 32 bit arch.

Enjoy! ;-)

Speed up your Centos box by using the pdnsd caching name server

Update: these exact same instructions work on EL6, too (tested it on my ScientificLinux 6 workstation).

Today I was looking into installing a dns caching server on my Centos box so it wastes less time looking up hostnames. I wanted something as light on resources as possible (my dom0 server has only 512MB RAM).
First I thought of dnsmasq, but then I reconsidered as I didn't want something that can also do DHCP, and anyway, AFAIK dnsmasq doesn't use the dns root servers, but your upstream ISP name servers.
My second thought was dnscache (from the djbdns suite), but I really didn't feel like compiling all that stuff (daemontools, ucspi etc). And anyway.. dnscache is _old_.
After all that fuss I remembered reading about pdnsd somewhere so I checked it out: exactly what I needed!

Why do I like it?
- It's small
- It's fast
- It's secure (goes around dns cache poisoning)
- Does persistent caching (good for not permanent connections, also for machines rebooting often)
- Knows IPv6
- Installation is very easy

Installing it on Centos 5 was a no brainer. The RPM package is not in any 3rd party repos that I use (mostly EPEL nowadays - and of course my own :> ). Luckily the developer also mantains RPMs for Centos x86_32 and x86_64:
rpm -ivh http://www.phys.uu.nl/~rombouts/pdnsd/releases/pdnsd-1.2.8-par_el5.x86_64.rpm
(It's a good idea to check the homepage as newer versions might be available)

The configuration is equally easy (a sample config file comes with the rpm package). Here's mine, should work on most servers:
// Sample pdnsd configuration file. Must be customized to obtain a working pdnsd setup!
// Read the pdnsd.conf(5) manpage for an explanation of the options.
// Add or remove '#' in front of options you want to disable or enable, respectively.
// Remove '/*' and '*/' to enable complete sections.

global {
	perm_cache=1024;
	cache_dir="/var/cache/pdnsd";
#	pid_file = /var/run/pdnsd.pid;
	run_as="pdnsd";
	server_ip = 127.0.0.1;  # Use eth0 here if you want to allow other
				# machines on your network to query pdnsd.
	status_ctl = on;
#	paranoid=on;       # This option reduces the chance of cache poisoning
	                   # but may make pdnsd less efficient, unfortunately.
	query_method=udp_tcp;
	min_ttl=15m;       # Retain cached entries at least 15 minutes.
	max_ttl=1w;        # One week.
	timeout=10;        # Global timeout option (10 seconds).
	neg_domain_pol=on;
}

# The following section is most appropriate if you have a fixed connection to
# the Internet and an ISP which provides good DNS servers.
server {
	label = "root-servers";
	root_server = discover; # Query the name servers listed below
				# to obtain a full list of root servers.
	randomize_servers = on; # Give every root server an equal chance
	                        # of being queried.
	ip = 	198.41.0.4,     # This list will be expanded to the full
		192.228.79.201; # list on start up.
	timeout = 5;
	uptest = query;         # Test availability using empty DNS queries.
	interval = 30m;         # Test every half hour.
	ping_timeout = 300;     # Test should time out after 30 seconds.
	purge_cache = off;
	exclude = .localdomain;
	policy = included;
	preset = off;
}


source {
	owner=localhost;
#	serve_aliases=on;
	file="/etc/hosts";
}

/*
include {file="/etc/pdnsd.include";}	# Read additional definitions from /etc/pdnsd.include.
*/

rr {
	name=localhost;
	reverse=on;
	a=127.0.0.1;
	owner=localhost;
	soa=localhost,root.localhost,42,86400,900,86400,86400;
}
/*
neg {
	name=doubleclick.net;
	types=domain;   # This will also block xxx.doubleclick.net, etc.
}
*/

/*
neg {
	name=bad.server.com;   # Badly behaved server you don't want to connect to.
	types=A,AAAA;
}
*/


Just save the above as /etc/pdnsd.conf and start the daemon:
service pdnsd start

Have it started upon boot:
chkconfig pdnsd on

And update your resolv.conf file:
echo nameserver 127.0.0.1 > /etc/resolv.conf

Enjoy!

Libreoffice repo for EL6

For those people who wanted to use Libreoffice on their EL6 workstations there weren't many options; basically you had to download a tarball from libreoffice.org and `rpm -ivh` the contained rpms manually - not the best way to have it installed and relatively painful to keep up to date.

But no more - I've been backporting Libreoffice for a while now from Fedora and you're free to use it!
Also, recently I noticed there are RHEL conditionals in the spec files. For those unfamiliar with RPM building this means Redhat is probably getting ready to include Libreoffice in their enterprise distro.

I don't know when we'll see Libreoffice in EL 6 officially but I know it won't be in v6.3. Until then you can use my repo - it should gracefully upgrade existing stock openoffice.org installations:

To install do the following as root:

rpm -ivh http://li.nux.ro/download/nux/libreoffice/el6/i386/nux-libreoffice-release-0-1.el6.nux.noarch.rpm
yum install libreoffice

To upgrade from stock openoffice.org:

rpm -ivh http://li.nux.ro/download/nux/libreoffice/el6/i386/nux-libreoffice-release-0-1.el6.nux.noarch.rpm
yum update

To replace Libreoffice installed from the official libreoffice.org rpms:

yum remove libreoffice\* libobasis\*
rpm -ivh http://li.nux.ro/download/nux/libreoffice/el6/i386/nux-libreoffice-release-0-1.el6.nux.noarch.rpm
yum install libreoffice

If you run into issues feel free to leave a comment or drop me a line: rpm @ li.nux.ro

Stella - a Centos desktop remix

Hello everybody, I'm doing a Centos 6 desktop oriented remix called Stella. This has been brewing since the summer and it's starting to get ready.
I've backported a lot of packages from Fedora and Rpmfusion and bundle several other repos, too, resulting in a big range of software available, including but not limited to:
LibreOffice, VLC, MPlayer, Shutter, Arista, Java, Flash, GParted etc

You can read (just slightly) more about it here: li.nux.ro/stella.
I'd love to receive any feedback.


Cheerio!
Nux

Hide other users' processes in Linux

And at last we have the equivalent of security.bsd.see_other_uids in Linux without the need to mess around with grsecurity! This is a security feature I've waited to land in Linux for a LONG time.
This characteristic can be enabled if you have kernel 3.3 (EL6/rhel/centos users can get it from here - thanks ajb!), but hopefully RedHat and other distributions will backport this feature in their kernels, too. The required patches are here and here.

So, how it works? Simple:
- mount /proc with the option "hidepid=1" to stop a regular user to see other processes but his when doing `ps` or `top`
- mount /proc with the option "hidepid=2" to not only stop the user from seeing other processes, but also disables the user's capacity to list /proc/$PIDs that are not his
- mount /proc with the option "hidepid=0" to go back to standard behaviour, all users can see all processes - this is the default
- there is also the "gid=xxx" mount option that lets the specified gid see all processes, even when hidepid is set to 1 or 2

You can read more about it here.

Enjoy!

Generating delta RPMs in EL6

man createrepo
Check the "--deltas" switch. :-)

Skype 4.0 on EL6 (CentOS/Stella, ScientifixLinux, RHEL, PUIAS) update

UPDATE 14th August 2014: Microsoft has released a new Skype version, 4.3.0.37 - you need AT LEAST this version to be able to login any more as they seem to have changed something in the authentication process. It is available in my repo, grab the latest from here: http://li.nux.ro/download/nux/dextop/el6/i386/

So after a long long time we finally have a new Skype linux release - and it's not even a beta!
This seems to be the first release under Microsoft's auspice and I hope it will run well and not bother the users with too many annoyances (I hear the Windows version has in-call ads now? wtf!).
As usual, EL users will still not be able to just "rpm -ivh" their packages - this has never been Skype's strongest point, not even after M$'s acquisition, but it's not like I was expecting anything.
Here's how to install it manually: http://wiki.centos.org/HowTos/Skype.

UPDATE: Now there is an RPM that does all the dirty work. If you run Stella or Centos with nux-dextop repo active then you can just yum install skype, otherwise:
wget
ftp://mirror.yandex.ru/fedora/russianfedora/russianfedora/nonfree/el/updates/6/i386/skype-4.0.0.7-3.el6.R.i586.rpm
yum localinstall --nogpgcheck skype-4.0.0.7-3.el6.R.i586.rpm
The RPM maintainer is Arkady L. Shane of the Russian Fedora community. Thank you, Arkady!

Enjoy!

Hardware accelerated video playback on EL6 (RHEL, Centos, SL) and Intel SandyBridge

Recently I got to play with a linux laptop that had an NVidia card and was impressed by how well and efficient mplayer is when using VDPAU.
My personal laptop however is an all-Intel one with a 2nd generation i5 SandyBridge CPU and no NVidia GPU, but an Intel HD 3000. This is quite a popular setup nowadays and this is actually great because it turns out we can have hardware accelerated playback using entirely open source software, no binary blob required. Linus will be happy. :-)

Don't get me wrong, this is a great machine and mplayer uses around 30% of one core when playing 1080p video, however this is no match for the under 10% when using NVidia's VDPAU.

So let's start. What we need is LibVA from splitted-desktop.com and gstreamer-vaapi (to enable acceleration in Totem) or/and a version of mplayer with VAAPI patches. I'll assume you are using Stella or EL6 with my repo nux-dextop.

yum install libva-freeworld gstreamer-vaapi
And that's it, open some HD content in Totem (aka Movie Player) and behold low CPU usage.

Thanks to Tux99 at SL forum for packaging gstreamer-vaapi.

If you want to use mplayer though we need to work a bit more and build it from source (until I'll make a package of it).
We need to install some development packages first:
yum install gcc make freetype-devel alsa-lib-devel pulseaudio-libs-devel yasm-devel patch subversion libva-freeworld-devel

Next we need to get mplayer-vaapi and build it:
cd ~/Downloads
wget http://www.splitted-desktop.com/static/libva/mplayer-vaapi/mplayer-vaapi-20110127.tar.bz2
tar xjf mplayer-vaapi-20110127.tar.bz2
cd mplayer-vaapi-20110127
./checkout-patch-build.sh
...wait for the build process to finish then you can merely copy the mplayer binary to somewhere in the path and that's it - we do this not to overwrite or mess up other pre-existing mplayer installatons in the system.
cd mplayer-vaapi
mkdir -p ~/bin
cp mplayer ~/bin/mplayer-vaapi

At this point we're pretty much done, try testing it by playing some HD mp4 file with the following parameters: -vo vaapi -va vaapi.
mplayer-vaapi -vo vaapi -va vaapi /path/to/HDvideo.mp4
and enjoy low CPU usage. :-)

If you want to skip inputing these parameters each time you want to use VA-API then simply add the following to ~/.mplayer/config :
vo=vaapi,xv,
va=vaapi


Here's the difference on my system:

Stock MPlayer, no acceleration:


VA-API enabled MPlayer:


This should work across all i3/i5/i7 chipsets (Intel HD 2000 & 3000), feedback welcome.

Linux software raid 1 versus hardware raid 1

For years I have used Linux' software raid and had only pleasant experiences with, however I have never actually compared its performance against a hardware raid card; until now.

So here are some numbers. The hardware used is a DELL PowerEdge R210: Intel X3450, 16 GB RAM, 2 x 250 GB WD SATA II. The HW raid card is a DELL SAS 6 (LSI).


- Linux kernel 'make':
	hwraid - 43m
	swraid - 43m 15s

- HDparm:
	hwraid: Timing cached reads:   9944.86 MB/sec; Timing buffered disk reads:  111.68 MB/sec
	swraid: Timing cached reads:   9669.00 MB/sec; Timing buffered disk reads:  108.92 MB/sec

- Kernel 'make' in a '2 CPU, 1 GB RAM' LVM based Centos 6.3 64bit KVM VM:
	hwraid: 50m
	swraid: 53m

- Concurrent kernel 'make' in 5 '2 CPU, 1 GB RAM' LVM based Centos 6.3 64bit KVM VMs:
	hwraid: avg time 84m, avg host load ~4.40
	swraid: avg time 88m, avg host load ~5.30

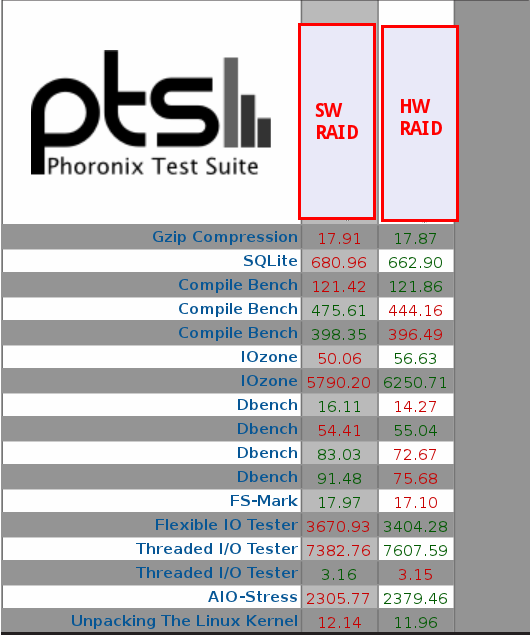
- Phoronix' disk oriented benchmark (phoronix-test-suite benchmark pts/disk):


Conclusion:

In some of the tests the software implementation fared better, in others the winner was the hardware card. The hardware solution seems to have the upper hand, but most of the results only differ by a small margin.

Personally I will prefer using the software implementation as it gives me better control and there's less "vendor lock-in" involved - it's also cheaper, but if a hardware solution gives you a better sleep at night, by all means use it.

Be advised that the LSI SAS 6 card, while decent, is by no means a "high end" piece of equipment. A DELL H700 may have fared a lot better in these tests; should time permit I will try to redo them on more performant hardware.

Stella 6.3 released

Following the release of CentOS 6.3 I finally managed to get Stella 6.3 out as well.
This is more an issue of incrementing the numbers since people running Stella have already received the updates from Centos 6.3. So, what's new in your favourite EL-based remix?

- all the cool new stuff in EL 6.3
- updated multimedia stack:
   new FFmpeg (0.10.4), MPlayer (1.0.14020120205svn) and VLC (2.0.3) (backported from RPMFusion. Thanks guys!)
- updated in nux-dextop repo: 
   Clipgrab (thanks symbianflo!), Minitube, Audacity 2.0 (available as audacity-freeworld)
- new inclusions in nux-dextop repo: 
   Megamario (SuperMario clone), Geeqie, Mumble suite, Phantomjs, Tarsnap and SCrypt

Also, as a bit of a news, pkgs.org is now indexing my repos nux-dextop and nux-misc - as such, searching for EL6 RPMs might give you results from li.nux.ro :-)


Download 64 and 32 bit (NONPAE as well) ISOs from a mirror near you:

UK
RO


For any problems with Stella GNU/Linux use the forums (preferred) or email me directly: stella@li.nux.ro.

ntop: service not configured, run ntop manually

So today after creating an ntop rpm package for EL6 I wanted to test this program.

After "yum install" I naturally tried "service ntop start" but only to get this:
Starting ntop: service not configured, run ntop manually


Of course, the service was not "configured" - by this ntop means that there is no admin password set for the web interface. To set a password you only need to do this:
ntop --set-admin-password=reallyBadpassword


After this ntop will start just fine. Enjoy!

EL6 power usage optimisation on Intel Sandy & Ivy Bridge

So you finally bought that fancy new laptop with a SandyBridge or IvyBridge chip, but the power usage goes through the roof when you use it on Linux? Well, there are a couple of things you could do:

1. Enable some nice features such as a lower power usage state capability of the Intel GPU (if you use the integrated Intel 3000/4000), frame buffer compression and optionally down-clock the LVDS refresh rate. Also, you can force PCI-Express to enable "ActiveState Power Management" which can save further power - just append the following to the kernel command line (in /boot/grub/grub.conf):
i915.i915_enable_rc6=1 i915.i915_enable_fbc=1 i915.lvds_downclock=1 pcie_aspm=force


2. Install and tweak tuned. Tuned is a Fedora utility responsible for tuning your system's power settings.
yum install tuned
service tuned start
service ktune start
tuned-adm profile laptop-battery-powersave


If you want to get even more serious about power saving, then the powertop program is very useful, too. For a graphical tool focused on power management have a look at Jupiter.
Feel free to play around with the settings and read the man pages for more information.
Be careful as some of these settings may cause some issues or instabilities. Use at your own risk.

New DJBDNS

Yesterday I needed to migrate a very old dns server running djbdns/tinydns on Centos 5 to a Centos 6 machine.
My 2 options were to convert the tinydns zones in BIND format and use this which comes by default in EL6 or install djbdns on the machine.
I really was not looking forward to "make, make install" sessions, but also converting the djbdns data was not very appealing - luckily though there's a fork of djbdns in Fedora nowadays called "ndjbdns" (new djbdns) which is fully compatible with the original implementation! All I had to do was to install it move the "data" and "Makefile" files over in /etc/ndjbdns/ and run "make".

The Fedora SRPM is quite RHEL/EL friendly so building it for Centos 6 was a breeze! You can find the RPMS in my nux-misc repo. Enjoy!

ZFS on CentOS

For those interested in running ZFS on EL6 via kmods, I snatched and updated the kmods in PUIAS. Testing so far has been _minimal_ (beware, Selinux needs to be in permissive mode or disabled altogether). Any feedback welcome.
Installation is very easy:
wget -P /etc/yum.repos.d/ http://li.nux.ro/download/nux/zfs/nux-zfs.repo
yum --enablerepo=nux-zfs install kmod-spl kmod-zfs zfs spl zfs-dracut
modprobe zfs

CentOS project testing MariaDB as possible MySQL replacement

According to certain messages on the centos-devel mailing list there is now a repository from the CentOS project dedicated to the MariaDB as a complete MySQL replacement.
It's high time MySQL started to get replaced in the linux distros!
hi guys,

quick start:
drop http://dev.centos.org/centos/6/mariadb/mariadb.repo into
/etc/yum.repos.d/ and yum list mariadb\*

This is adapted from the Fedora spec adapted by Johnny for CentOS-6 and
upgraded to 5.5.29; we have done some basic testing on these packages
and they worked for us. We are now looking for wider testing and
feedback about both the packaging, the payload and how its setup as well
as any build issues.

These packages are setup to replace MySQL on your machine, so be
careful. And we consider these rpms to be of Testing grade, unsuiteable
for production at this point.

Post feedback as follow up to this email, or at bugs.centos.org/

Stella 6.4

Following the release of Centos 6.4 recently I'm pleased to publish the same version of Stella.

There is nothing special about this release other than the changes brought in by EL 6.4.

Download from the usual locations:
http://mirror.li.nux.ro/li.nux.ro/ISO/
http://ftp.ines.lug.ro/li.nux.ro/

Enjoy!

Cloudstack Centos 6 template

Everytime I installed Cloudstack I had to limit my tests to the bundled Centos 5.5 template, which is not the best one around.
For this reason I created a nice and clean minimal CentOS6 64bit template that has the password and ssh key init scripts installed and functional.
You can download it from here: http://li.nux.ro/download/cloudstack/images/

Make sure to consult the README file.

Setting up Confluence behind mod_proxy

I've recently tried to set up Confluence behind Apache HTTPD (mod_proxy) and it did not go as smoothly as the Atlassian docs suggest.

Here's what needs doing:
1 - Go here and download the 64 bit Linux installer (I'm on Centos 6 64bit)
2 - Make it executable and execute it, use the default values when asked or what you think is appropriate
3 - If you want to use a MySQL DB download this and extract from it mysql-connector-java-5.1.27-bin.jar, putting it in /opt/atlassian/confluence/confluence/WEB-INF/lib/ on the server
4 - Restart Confluence: service confluence restart
5 - Go to http://confluence.example.com:8090 and finish the setup, then go in Confluence Admin -> General Configuration and edit the Site Configuration Edit, updating Server Base Url to match the subdomain you want to use in the end, e.g. http://confluence.example.com or https://confluence.example.com if you want SSL. Save the settings.
6 - Enable proxing in Apache httpd; edit /etc/httpd/conf/httpd.conf and modify your virtualhost such that it looks like this:
<VirtualHost 12.34.56.78:443>
DocumentRoot "/var/www/confluence"
ServerName confluence.example.com
SSLEngine on
SSLCertificateFile /path/to/server.crt
SSLCertificateKeyFile /path/to/server.key
ProxyRequests Off
ProxyPreserveHost On
ProxyPass / http://127.0.0.1:8090/
ProxyPassReverse / http://127.0.0.1:8090/
</VirtualHost>
7 - Edit /opt/atlassian/confluence/conf/server.xml and add this in the Connector's line: proxyName="confluence.example.com" proxyPort="443" scheme="https" so that it resembles this
8 - Restart both httpd and confluence services
9 - Go to https://confluence.example.com and enjoy!

Taking KVM volume snapshots with Cloudstack 4.2 on CentOS 6.5

Apache Cloudstack cannot currently take KVM VM snapshots, but it can handle ROOT and DATA volume snapshots using qemu-img. This functionality can be enabled in Global Settings -> "kvm.snapshot.enabled".
This feature worked fine in previous versions of CentOS (6.0-6.4), however starting with 6.5 qemu-img no longer recognises the "-s" parameter that Cloudstack uses to take the volume snapshots.

This problem can be worked around in many ways, for example by downgrading qemu-img to the 6.4 version, but this idea may not appeal to those who like to stay up to date.

Another more elegant workaround that I've discovered since getting my hands dirty with ACS is that the script[1] which is responsible for taking the snapshot first looks for a "cloud-qemu-img" in the $PATH, if it can't find any it will fallback on whatever `which qemu-img` returns. So, the solution is as simple as getting the old qemu-img installed as cloud-qemu-img; this can be done like this:

mkdir cloud-qemu-img
cd cloud-qemu-img
wget http://vault.centos.org/6.4/updates/x86_64/Packages/qemu-img-0.12.1.2-2.355.el6_4_4.1.x86_64.rpm
rpm2cpio qemu-img-0.12.1.2-2.355.el6_4_4.1.x86_64.rpm |cpio -idmv
cp ./usr/bin/qemu-img /usr/bin/cloud-qemu-img
VoilĂ ! This is probably the best solution because it doesn't modify the Cloudstack script nor does it interfere with the stock qemu packages.

[1] - /usr/share/cloudstack-common/scripts/storage/qcow2/managesnapshot.sh

Installing a 64bit kernel into a 32bit CentOS OS

Today I needed to make a CentOS 6 32bit OS see 24 GB RAM. Unfortunately, although the default 32bit kernel from RH already has PAE enabled, it will not handle more than 16 GB RAM, the only solution that came to mind was to use a 64bit kernel.
This is possible, but does not seem like a very good or elegant solution, at least not for long term; however it's WAY quicker than a full reinstall.
All one needs to do is get the 64 bit kernel from a mirror and install it via rpm:
wget http://mirrors.coreix.net/centos/6/os/x86_64/Packages/kernel-2.6.32-431.el6.x86_64.rpm
rpm -ivh --force --ignorearch kernel-2.6.32-431.el6.x86_64.rpm
That's it, now edit /boot/grub/menu.lst to make it default and off you go: reboot!

Install Skype on CentOS 7 (and other RH clones)

Hello there. CentOS 7 is a fresh and major release, but fear not, Skype works well on it.
As usual, just yum install skype if you have my nux-dextop repo installed or just grab the latest RPM from here http://li.nux.ro/download/nux/dextop/el7/x86_64/ and install it.

Don't be shy and let me know if you encounter any issues - rpm at li.nux.ro !

Stella 6.6 released

As a result of CentOS 6.6 release we have bumped up the version as well, so enjoy all the goodies of CentOS + extra desktop stuff with the new Stella.

Download it from the usual locations and let us know if you run into any issues!


Nux!

Nested virt - Xenserver on KVM

At openvm.eu we need to test templates on Xenserver and KVM, however the basic OS for the build environment is CentOS 7 (with KVM).
In order to test the templates on Xenserver we had to run this HV as a KVM guest (gotta love virtualisation!); however by default Xenserver will complain that you can't run any HVM guests, only paravirt ones (PV). This sucks because PV is used less and less with HVM being in the spotlight.

Luckily with KVM we can forward the VMX CPU flag to a guest and as such make it available to Xenserver, for it's HVM mode.

There are a few things to be aware of though:
1 - in libvirt do give the Xenserver VM a good CPU profile (I used Core2duo) and make sure the VMX flag is set on "require"
2 - stock CentOS 7 kernel has a problem with nested virt at the moment, do use a newer kernel[1] (I'm using kernel-ml from elrepo-kernel)
3 - make sure the kvm_intel module is loaded with the option nested=1. For this to happen I reload/rebooted with this in /etc/modprobe.d/kvm-intel.conf:
options kvm-intel nested=1

Now enjoy docker on centos, in xenserver on kvm on centos. :-)


[1] - https://bugzilla.kernel.org/show_bug.cgi?id=45931 - this will likely be fixed in future CentOS/RH kernel updates, I hope

Changing an AD password from CentOS Linux

Changing the AD password from linux is surprisingly straighforward.
Just run the passwd command as you would normally!
If that doesn't do it, then just issue this command, replacing of course the variables with your own values:
smbpasswd -r $AD-server -U $AD-username

VoilĂ , enjoy!

Setting up Varnish in a CentOS server

I've seen Varnish

Varnish is one of those small, shiny, remarcable jewels of the open source world.
It can make an enormous difference in how your web application responds and how fast your web site loads.
It's all in it's caching feature and not only; I've seen people use it as an web application firewall (search github) and out of the box it will only forward well formed HTTP requests to your backend, acting as a filter against malicious activity or scans against your server.
It'll also take the brunt of a syn flood attack, sparing Apache HTTPD or Nginx which usually go belly up quite fast.


Performing an install of Varnish in CentOS 6 is quite trivial as they provide a yum repo:
yum -y install https://repo.varnish-cache.org/redhat/varnish-3.0.el6.rpm
yum install varnish
Out of the box it will listen on port 6081 and will not do much caching. If you want to modify how it works you need to edit 2 files:
/etc/sysconfig/varnish
/etc/varnish/default.vcl
The first file tells Varnish what kind of cache to use and how big, also on which ports to listen to.
The second file configures the backend servers and the way in which the caching is done. Configuring caching in Varnish is not for the faint of heart, so do a serious read-up of the documentation before-hand; there are also many examples online.

Both those files come with working defaults, all you need to do is point your web traffic at it and here you have 2 choices at least:
1 - Assuming Varnish sits on the same IP/machine as the backend, change the port of your web server to something other than 80 (like 8080) and set Varnish to use port 80
2 - Do a redirect from iptables, this is my favourite as it doesn't need any reconfiguration of the web servers:
iptables -t nat -I PREROUTING -i lo -j ACCEPT 
iptables -t nat -I PREROUTING -s LOCAL_IP -p tcp -m tcp --dport 80 -j ACCEPT
iptables -t nat -I PREROUTING -p tcp -m tcp --dport 80 -j REDIRECT --to-ports 6081 

Before you do that, however, you need to tell Varnish which is the backend web server. This is done in /etc/varnish/default.vcl like this:
backend default {
  .host = "LOCAL_IP";
  .port = "80";
}

* LOCAL_IP is your servers IP
You can check the configuration is correct with this command: varnishd -C -f /etc/varnish/default.vcl
Restart Varnish so it's up and running with your configuration: service varnish restart
You can use the commands varnishtop or varnishstat to see what is going on.
Once you do this HTTP traffic will go through Varnish and then to your backend, one consequence of this is that your Apache log will show that all requests are coming from the local IP instead of your visitors' IPs. You can solve that by installing and configuring mod_rpaf.


Enjoy!